
Firstly, unless you're going to be a complete lone wolf and
snipe or mess around, you should always join a squad for the simple reason that
you get an extra spawn point: your squad leader or his spawn beacon.
The Do's and Don'ts of a Squad Leader
Do's
Check to see if there are any assigned
players on your team. If there are and you think you're a half decent squad
leader, then create your own squad and invite the unassigned people which you
can check by pressing tab and selecting the squads option and scrolling down to
the players who are under the heading "unassigned"
Stay alive! you act
as an extra spawn point for your squad so you're quite useless when you're dead.
If your team is spawning on your, you should let them do all the fighting and
you should just stay under cover and stay alive.
Keeping giving orders
to your squad to either attack or defend a command post.
You should
always be thinking of ways to get around the enemy to provide your team with a
good location to spawn on you, especially on maps such as Camp G, Fall of Berlin
and Cerbere Landing.
On Cerbere Landing, if you're attacking on the PAC
team, try to get the jeep and drive all the way to the enemy home base, remember
to destroy the jeep when you get there, because it respawns at your home base
after a while. Climb to the top of the building and place the spawn beacon on
the roof. allow your squad members to spawn there and keep checking those
ladders for EU soldiers trying to get up to destroy your spawn beacon. Even if
you do cap the EU's base flag, keep the spawn beacon on the top of the roof, as
you never know when the EU team could cap their base flag again.
When
boarding and attacking an enemy Titan, it's a good idea to place a spawn beacon
on the enemy titan. Good places to put them are on top of the cylinders in
between the two Titan AA guns and on the bottom platform somewhere. just make
sure you put them in the centre of the titan, not towards the left or right of
it; there's nothing more annoying than spawning and landing on the edge of the
titan or falling off and having to commit suicide because there aren't any
vehicles around to get back onto the titan.
The best vehicles for squad
leaders are the APC, air transport and the jeep (FAV), as they are relatively
fast and can lots of passenger spaces for your squad members to spawn into.
Drive around in these vehicles and drop off squad members at enemy
flags. A great tactic especially when you have a 6 man squad is to pilot the air
transport on a conquest map and constantly fly around enemy flags, allowing your
squad members to steal enemy vehicles and cap the enemy flag.
Accept
commander's orders unless they're ridiculously wrong. If you're defending on
Camp, Cerbere or Berlin, don't ignore red dots or empty jeeps near your base.
These are a sign that the enemy team is trying to get behind your lines of
defence. although you may not like it, sometimes the best thing to do in this
situation is to commit suicide and spawn back on the home command posts and
defend them. hopefully, our squad members will be smart and follow your example.
Don'ts
If you can avoid it's best not to deploy
the spawn beacon as it's much more stealthy if your squad members spawn directly
on the ground next to you rather than podding down which alerts the enemy to
your spawning location.
If you're playing as a medic, refrain from
trying to revive your downed squad members when there are enemy soldiers around.
Your top priority is your own survival, as they can spawn on you anyway after 15
seconds.
Never deploy a spawn beacon under a roof. it doesn't work!
Don't deploy a spawn beacon on the edge of a map or Titan. You don't
want to spawn outside of the map like on Camp G or fall off the enemy titan.
Don't get into a gunship. if both the pilot seat and the gunner seat are
taken, then your squad can't spawn on you. Your primary goal is to act as a
spawn point and get close to enemy flags. if you're in a gunship, the chances
are, one of your squad members will spawn inside the gunship and unless they're
smart, they won't jump out onto enemy flags. so avoid using gunships.
Avoid using tanks and walkers as well, as they only have one passenger
space. chances are that your squad members aren't smart and won't get out for
the rest of your squad to spawn on you.
The Do's and Don'ts of a
Squad Member
Do's
try to follow the orders
of your squad leader unless he's giving a ridiculous command which is obviously
not going to work.
If you're on an infantry-focused map, try to be a
medic, and make sure your squad leader stays alive!
Keep checking your
map to see if your squad leader is close to an enemy flag. If he is, spawn on
him. You may even want to commit suicide to spawn on him. Although you lose
points and a life, it could be worth the sacrifice in the round, especially on
maps like Camp G when the PAC team are capping the EU's flags.
If you
think your squad leader is being a *, piloting a gunships and not doing his job
properly, then feel free to join another squad leader who will do a better job.
Don'ts
Don't join a squad where the squad leader
is obviously not being focused about squad leader duties. Don't support these
buffoons who just want to get extra points by being a squad leader.
don't ignore your squad leader about defending flags. Especially if
you're on Camp G, Fall of Berlin or Cerbere. If you're defending, you don't want
to be attacked from all directions. and if you're attacking, you don't want your
capped command posts to be lost, after all that effort to cap them in the first
place.
On maps like Cerbere and Camp G. If you're not a squad leader,
avoid using the jeeps, because it is better if the squad leaders use the jeeps
and get behind enemy lines as they can get their squad to spawn on them, whereas
you obviously can't.
- (1-100)
- (101) Knives do partial damage and no longer always one-hit kills
- (102) Medic first aid kits now require time to heal; no longer one-hit
health
- (103) Sniper stabilizer requires [Left
SHIFT]
- (104) Only one squad leader unlock at a time. Pick up squad beacon (and kits) with [G]
- (105) Hover in the gunship with [S]
if you don't have or use a joystick.
- (106) Even though you don't hear yourself, you are saying "You're hurt, come here" or "need supplies?" and your team (and the enemy) can hear you.
- (107) 3D Map is [left ALT] and
toggles numbers over silos, flags over control points, distance to them, and
NetBat red diamonds
- (108) While you are critical and wait to respawn, press [C] for 3rd person camera view of teammates
- (109) The PAC team can be heard in English, just like the EU team. Select
the English Voice Over Only in Options --> Audio
- (110) Practice flying skills by creating a local server (with no one trying to kill you while you learn). Multiplayer --> Local --> Create tab --> Pick a map with air assets --> :)
- (111) Hover in the transport helicopter by releasing the throttle [W] if you don't have or use a joystick.
- (112) Blood? Try changing cross hair color to red and the damage indicator flashes look similar to the blood in many FPS games.
BattleField 2142 Detailed Vehicle Armour Overview
I tested the armour of all vehicles with a Rocket laucher. All vehicles have 100 Armour Points (APs) to start off with, and have areas where a shot with an anti vehicle round takes off more damage.
When a vehicle has equal or less than 15 armour points, it starts to burn out, and if not repaired in time, gets destroyed. The red colour coded areas below take off around 90-95 points of damage, so effectively any shot on red areas mean a kill if no engineer or crate is repairing it.
All numbers below represent the damage taken off the total APs of the vehicle when hit by a Pilum round. For example; a hit on any green area of a walker takes off 16 points of damage, therefore the walker is left with a total of 84 APs.
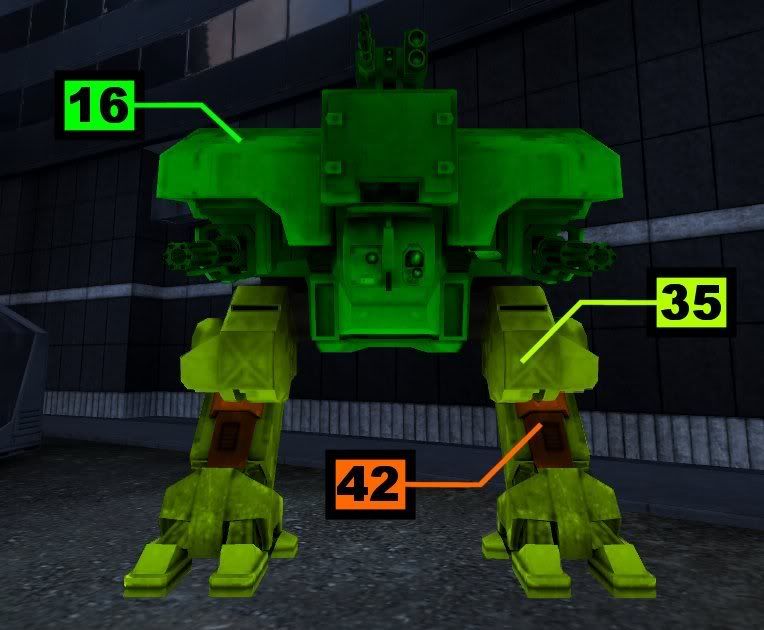
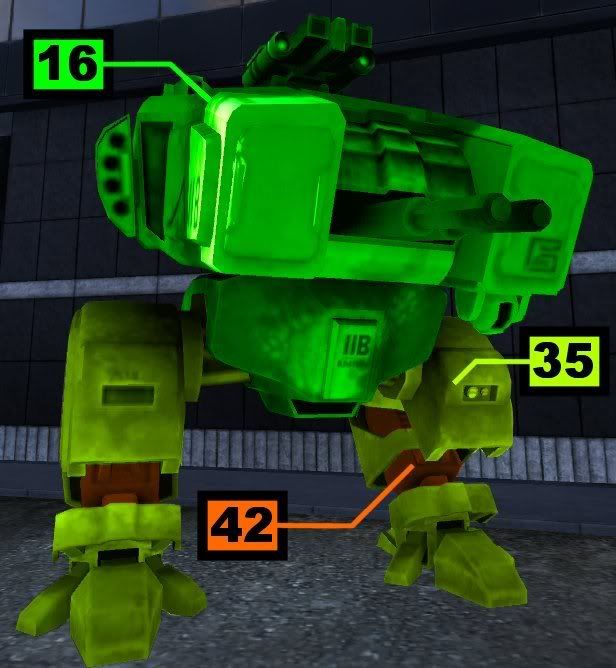
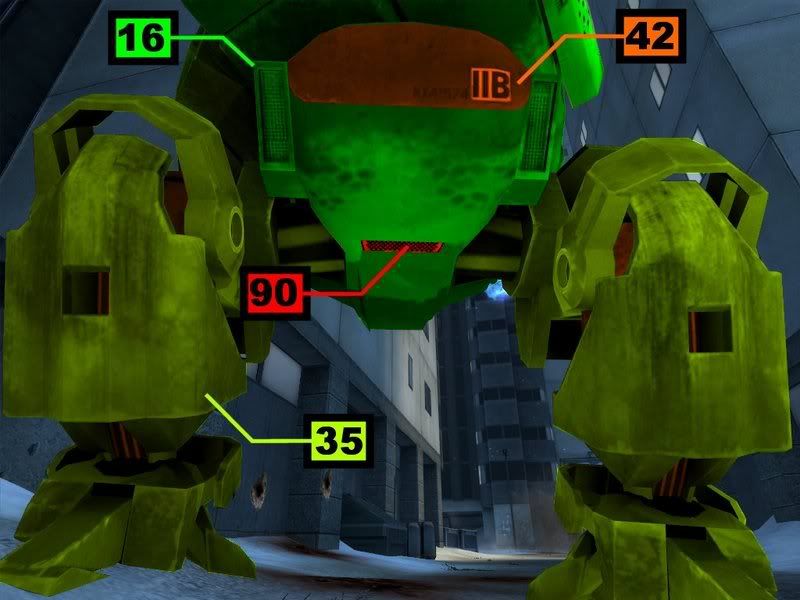
Anything above the midsection is heavily armoured
and a direct hit would only take off 16 APs. The legs are slightly
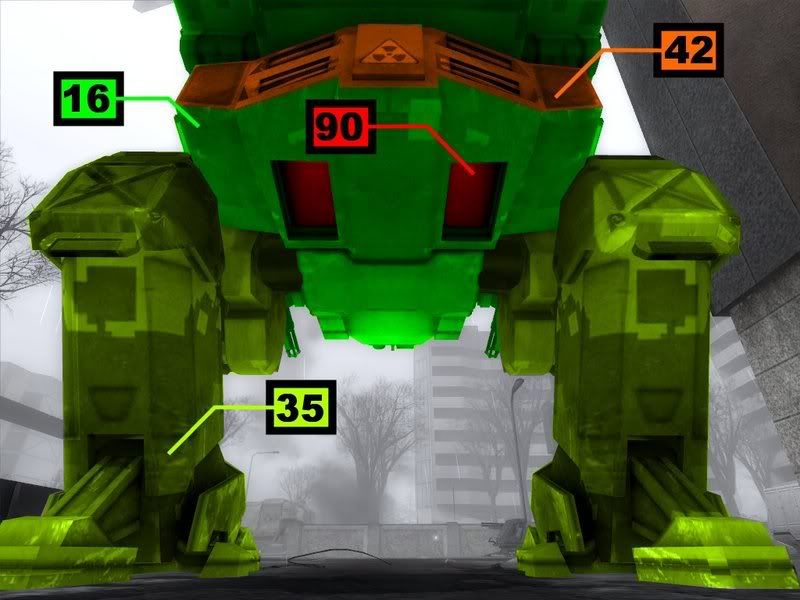
weaker taking off 35 points. Walkers also have vents at the underside
of the middle section which are vulnerable to all weapons (Taking down
a walker using non AT weapons is possible and takes off 1 AP per
bullet). A Pilum hit in one of these vents takes off 90 APs, although
the underside around the vents is heavily armoured so you need a direct
hit. If you can’t access these vents aim for the legs and the weak
points between the leg armour which is marked orange and takes off 42
APs. When the Walker is crouched these armour plates pinch together
which covers the weak chinks in the leg. Be careful of this, as if
you’re standing underneath the Walker while he is crouching, your only
use to your team will be on pancake day. So be sure to crouch or go
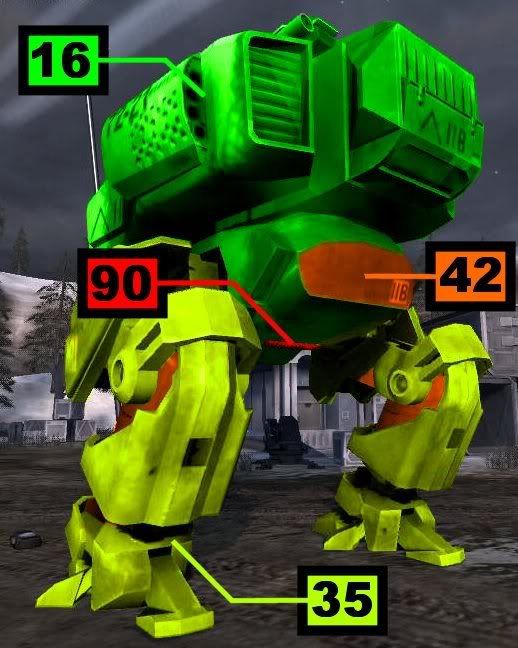
prone when you’re under a Walker, just in case.If
you’re attacking from behind, the back of the middle section is also a
vulnerable spot which is marked orange on the diagram and takes off 42
points, the same as the weak points on the legs. 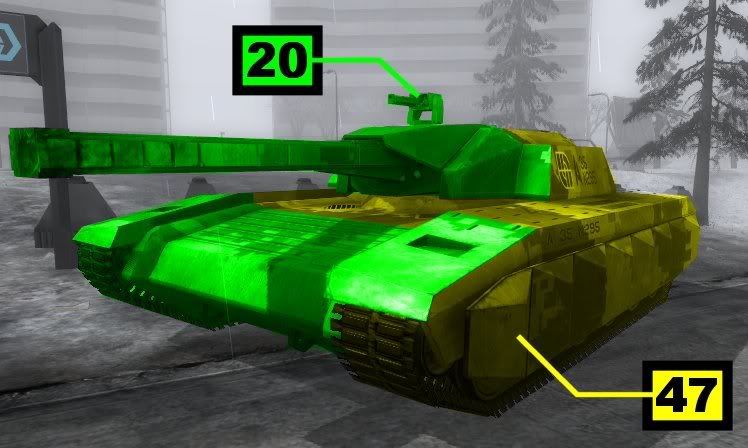
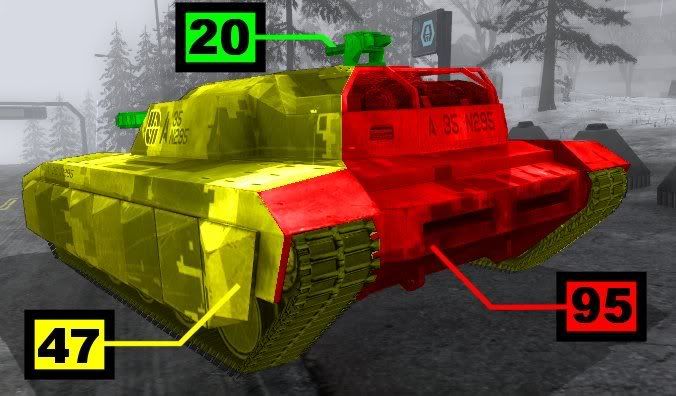
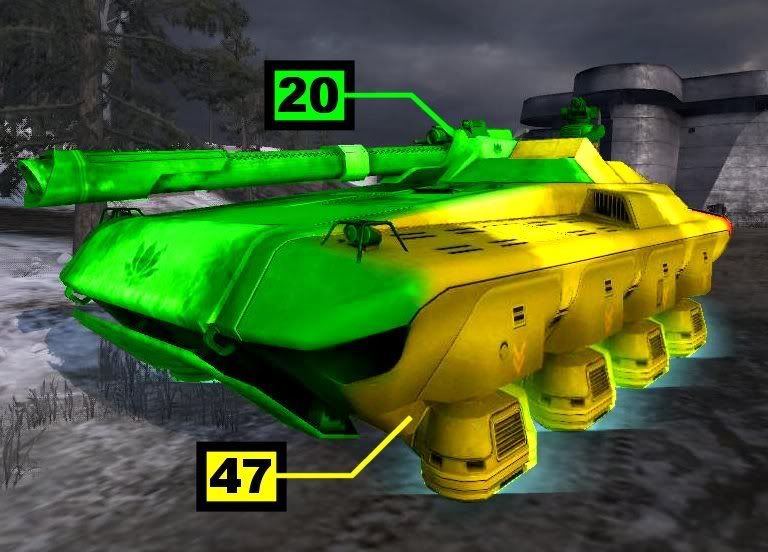

Tanks are extremely vulnerable on the rear, one shot with any AT weapon will take off 95 points off the armour. The side and most of the top of the tank is marked yellow and takes off roughly half of the APs (47). Most of the front and the turret (including the secondary gunners turret) is marked green and takes off 20 APs.
When in front, aim for the tracks and from the side aim for the area just behind the turret which will be as good as a rear shot.
[Note] The lights on each side are normally red and not weak points in the armour.
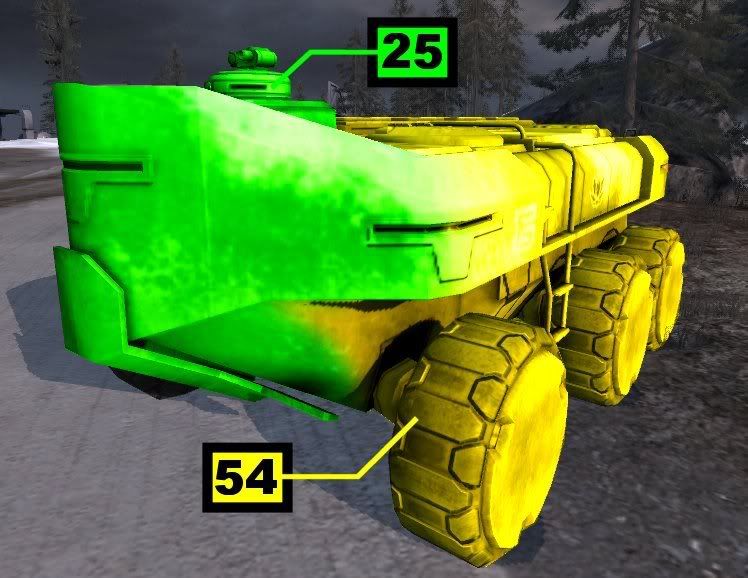
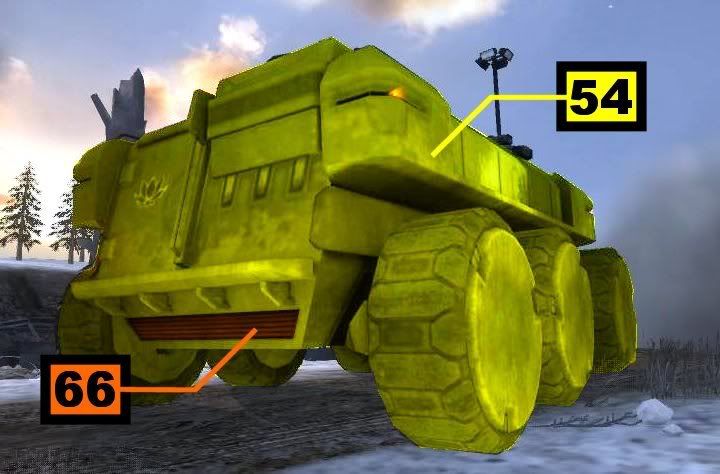
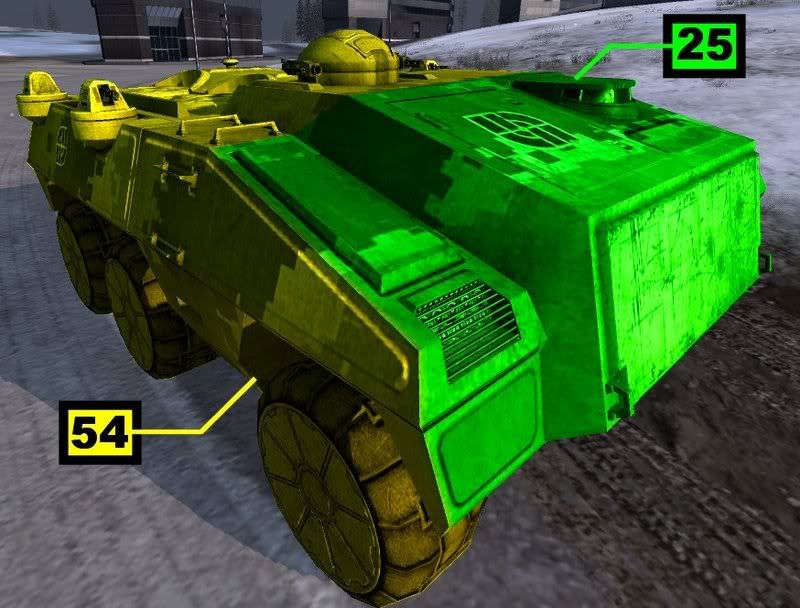
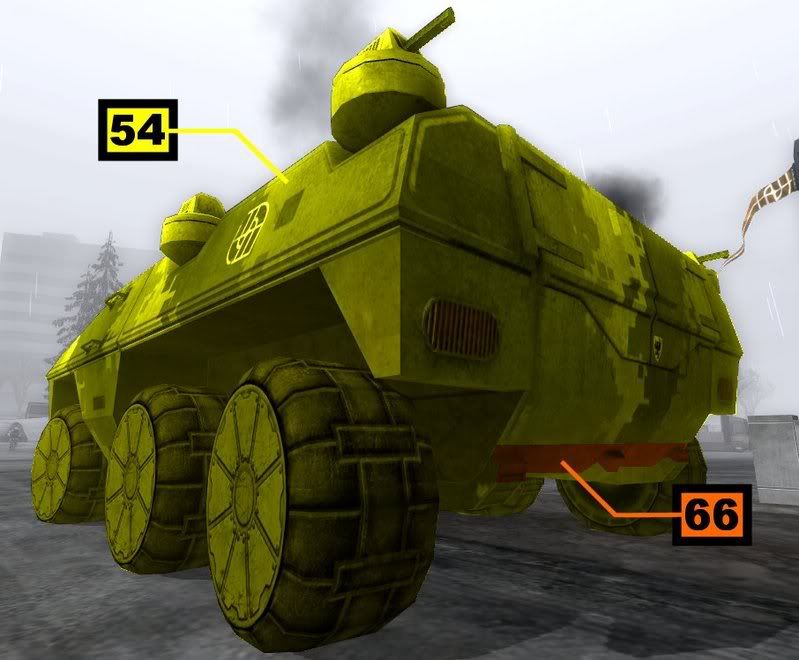
Most of the APC is marked yellow where a hit would take off more than half of the APs (54). The front (marked green) takes off 25 APs. Unlike the tank the APC doesn’t have an extremely weak rear area but does have vulnerable vents located at the rear. However an AT weapon hit on these vents only takes off about 66 APs which isnt as much as the 95 points on the tank. Although having less overall armour strength than the tank, the APC counter-acts this with having less weaker areas.
When in front, aim for the wheels and when behind aim for the vents.
The rest have no weak points and a hit anywhere will take off the same amount:
FAVs:90Gunships:90
Hacimotos:90
Air Transports:60
Any time during play, you can customize your kit. The changed
equipment will be in your inventory on next spawn.
2. When you are playing as a squad, you will see the Field Upgrade Bar in
the upper-left corner. When this is full, squad members are eligible to
select a Field Upgrade. (2)
3. Field Upgrades are temporary unlocks. Once unlocked, these can be used as
long as you stay on the server. (3)
4. The three Squad Leader Unlocks can only be used by Squad Leaders. Anyone
can unlock them, but only Squad Leaders with a squad of a certain size are
allowed to use them. (4)
5. The five player ability unlocks can be unlocked as any other weapon or
item. The difference is, once unlocked they are always equipped and not a
part of the customization. (5)
6.On the Kit Customization screen - you can choose between light or heavy
body armor. The heavy armor reduces the sprint capacity, so it's not all
good with more protection. (6)
7.When you are promoted during a round, you can choose the unlock at the End
of Round or - if you are in a hurry to get back to the fighting - wait and
do this later on in BFHQ. (7)
Do not forget to check out the training film on the Titans. The film will
guide you through the tactical information on the Soldier HUD, the rules of
the battle, and provide valuable tips on how to best bring down the enemy
Titan. (8)
Anytime during a round, you can press ESCAPE to get to the menu. Once you
are done, just press ESCAPE again and you will return to the fight. (9)
Getting recommended for badges, ribbons and pins will help your Soldier's
progress up in rank. (10)
Watch out for those Sentry Guns support troops can deploy. You do not want
to get too close before finding out if they were deployed by friendlies or
enemy troops. (11)
You do not have to choose an unlock right away. Your unlock credits will be
available in the Unlocks section of BFHQ. (12)
The Leaderboards in BFHQ show the best of the best. They can be filtered to
show just your buddies, players from your country, or to only show the
players you have dog tags from. (13)
The graph showing your stats progress in BFHQ will also predict your
upcoming performance based on your recent efforts. (14)
Several awards can be achieved multiple times and they help you go up in
rank. (15)
You can join a server your Buddy is playing on by pressing the join button,
in the expanded Buddy List. (16)
When you knife kill someone, you get their dog tags. Snipers all over -
beware. (17)
Some unlocks are not items but permanent upgrades to either kit or soldier.
(18)
The Gruber 5 Scope Stabilizer unlock helps you settle your rifle drift as a
sniper. Unlock it and pick off those dog tag collectors more easily. (19)
The A12 Enforcer Sentry Guns will scan the area for enemies. Tactically used
they can be very effective in guarding important areas or paths. (20)
Commanders and Squad Leaders can give orders by using the context sensitive
communication rose (default on 'T'). Just aim at a strategic spot and send
the order. (21)
Look out for drones as a good way of spotting a Squad Leader. Be sure to
spot them before they spot you. (22)
Sentry Guns can be destroyed by firing at them. Or why not take them out
with a well-placed EMP grenade? (23)
The enemy Titan giving you and your teammates a hard time? Do not forget
that the weapon systems on the Titan exterior can be destroyed. (24)
EMP is an effective way of temporarily disabling vehicles. An EMP mine will
do the job faster than the EMP grenades. Sneaky people are known for
hijacking vehicles this way. (25)
A sniper who aims at the head will be more successful than the one that goes
for the easy body shot. (26)
If you run out of ammo your sidearm can be a lifesaver. Do whatever it takes
to keep your dog tags. (27)
The away bonus will help you get back on track with your career after some
R&R. But the fastest way to go up in rank is to earn it on the battlefield.
(28)
Any kills following your Squad Leader's attack or defend orders will
generate a bonus score. (29)
If you see a "2" next to a player's name, this means they are veterans from
Battlefield 2(TM). So, either be extra careful around those vets, or go
after them extra hard to welcome them to the future. (30)
Which weapon is the Voss L-AR? Read more about it in BFHQ Unlocks or on the
Kit Customization screen. (31)
You can have up to four (4) Soldiers with their own persistence per EA
Account. If you would like to create a fifth Soldier, you will have to
delete an existing Soldier first. (32)
Field Upgrades are only rewarded to soldiers in squads. This is one of the
many reasons squad play might be the way to go, if you want the best
experience. (33)
The NetBat system allows soldiers in the same squad to share information on
enemy locations. (34)
Use the Squad Leader Bacon together with scrambled eggs for a nutritious
breakfast for all of your freshly spawned squad. (35)
The Squad Leader Spawn Beacon allows squad members to spawn in on tactical
locations. However, soldiers will be dropped in pods, so it is not the most
stealthy spawn. (36)
Titan Commanders should be careful to avoid putting their Titan directly
over a missile silo, as it will hit their Titan even if it was aimed for the
enemy. (37)
Squad Leaders will climb the ranks faster if they have a habit of issuing
tactically correct orders. The same is true for Commanders. (38)
Squad members will gain from carrying out their Squad Leaders' orders. Each
kill while following orders will count in the pursuit of the next rank. (39)
The Commander score is determined by the individual team members' scores.
And if the Commander leads the troops to a victorious round, there will be
an additional bonus. (40)
Do not forget to customize your kits. Your last configuration will be saved.
(41)
APCs have seats equipped with launch pods, which provide an excellent way of
getting aboard the Titan. (42)
If you experience motion sickness during play, set Camera Shake OFF in the
Options. (43)
Each kit has two separate unlock branches, which both lead to a new weapon.
Go wide if you want a little bit of everything, and go deep if you more
quickly want to unlock a new main weapon. (44)
Your skill in combat and the support of your fellow troops will - together
with the awards you receive - add to your experience and help you climb the
ranks. (45)
Don't forget you can pick up fallen soldiers' kit equipment. They might have
more unlocks than you, and this is an excellent way to try them out. (46)
Field Upgrades are an excellent way to try out unlocks before you unlock
them permanently. (47)
Squad members will gain from carrying out their Squad Leader's orders. Each
kill while following orders to attack or defend gets the squad one step
closer to a Field Upgrade. (48)
Healing, reviving and rearming your fellow squad members - and repairing
their vehicles - will give you points and also help your squad getting a
Field Upgrade. (49)
When you play a Co-op game, any number of friends can join the game up to
the 16 player limit. When someone joins, a bot will be kicked out of the
game. (50)
When you play a LAN game or a Singleplayer game - as long as you are
connected to the Internet you will be able to use the items and weapons you
have previously unlocked. (51)
Active Defense can be used on most vehicles to protect you from incoming
missiles and rockets. You'll have to use it carefully as it only lasts for a
few seconds and takes a while to recharge. (52)
Boost is available on the fast attack vehicles - use it to get out of those
nasty situations in which only speed can save you. (53)
Vehicles have different armor values in different locations. For example,
many vehicles have less armor in the rear than in the front. Try to keep
this in mind when you go up against other vehicles. (54)
You cannot armor everything - some vehicles have inherent weak spots which
have less armor and are more vulnerable to fire from more types of weapons.
(55)
APCs have assault pods which can be used to launch into combat. When
launched, you can control their flight using the standard movement keys.
(56)
Weapon accuracy varies depending on your stance, movement and whether you
are zoomed. Practise with each weapon so that you understand its strengths
and weaknesses. (57)
Not all weapons are created equally - they are designed to be good at
different ranges and conditions. Practise with each weapon to learn more
about its strengths and weaknesses. (58)
Infantry can equip themselves with light armor which allows them to sprint
further and recuperate from a sprint faster. However, light armor provides
less protection. (59)
Visual disturbances and electronic sounds might be signs of a Recon soldier
using the IT-33 Active Camouflage in your immediate vicinity. Use an EMP
grenade to reveal them. (60)
The Networked Battlefield is your squad's best friend. Look at an enemy unit
and you will pass information such as the type of enemy to the rest of your
squad. (61)
When in a squad, watch for the Networked Battlefield icons in your 3D HUD.
These icons indicate that someone in your squad is viewing or engaging an
enemy and you can move into a supporting position. (62)
Different infantry types can provide different functions for the Networked
Battlefield. Each infantry type has its own speciality. Practise with your
squad members to get the best use out of the system. (63)
Networked Battlefield icons appear anywhere a squad member has made contact
with the enemy. Just because you see the NetBat icon doesn't mean that the
enemy is in your visual range. (64)
When using the Scope Stabilizer unlock, be sure to hold the 'SHIFT' key
(default) down in order to use it effectively. (65)
You can set the range at which a rifle rocket explodes. When in zoom mode
roll the mouse wheel to set the detonation range. When fired, the rocket
will auto-explode at the preset range. (66)
The smoke grenade is a highly effective tool for the assault soldier. It
provides excellent cover during an attack in tight quarters and is
especially useful during a Titan boarding. (67)
The PDS-1 unlock allows the engineer infantry to fix the position of enemy
vehicles. Place it to cover known routes and it will update you and your
squad via the NetBat. (68)
The AE Defuser unlock allows Engineer infantry to remove explosive devices.
Keep an eye out for the enemy who set the explosive as they may be using it
to bait you. (69)
The II-29 Motion Mine unlock is the latest generation of anti-vehicle
explosives. They will actively track on moving enemy vehicles and follow
until they make contact and explode. (70)
The DysTek Pulse Meter is a short-ranged reconnaissance tool which will
identify any enemy units in range. The information will be passed on to each
squad member via the NetBat. (71)
EMP can be used to stop a vehicle in its tracks as well as hinder their
ability to track and engage opponents. While the effect is temporary it is
still very effective in making vehicles vulnerable. (72)
Can't move your vehicle? Is your HUD showing discharge and visual glitches?
You've just been EMPed. Your options are to wait until the effect passes or
get out of the vehicle. (73)
EMP can affect infantry by causing their advanced helmet optics to
experience temporary visual glitches. (74)
The IPS Shield unlock is the perfect tool for providing cover when
necessary. It blocks small arms fire but vehicle munitions will penetrate it
easily. (75)
The IPS Shield unlock can block most bullets. However, if you aim at the
control box you can disable it. It takes a skilled rifleman to shoot the
small target. (76)
The SLSB unlock is only available to the squad leader. It allows the squad
leader to place a spawn point on the map. The beacon can be seen and
destroyed by opponents. (77)
The DysTek Pulse Meter can fix the position of enemy squad leader beacons.
Use it when you suspect a beacon has been placed nearby. (78)
The RD-4 Otus is a squad leader unlock. It functions as a recon drone
identifying enemy units within range. The information is passed on to the
squad via the Networked Battlefield system. (79)
The SD-8 Accipiter is a squad leader unlock. It will target and engage enemy
infantry which appear within its target acquisition field. Extremely useful
for watching the squad's back. (80)
Even with no or few unlocks you can activate or deactivate your heavy armor,
on the Customization screen. (81)
The two icons to the left of the soldier in the Customization screen are the
HUD and kit upgrades that you can unlock. (82)
Make sure you check these game tips during load since they do change. (83)
From the in-game scoreboard, you can invite other players to your Buddy
List. Go to the Manage tab of the scoreboard to send a request to a specific
player. (84)
If you hit an opponent there will be a small white indicator around your
crosshair to help you. If you never see this, you might want to adjust your
aim. (85)
When you are getting hit by incoming fire there will be an indicator that
lights up in the direction of the threat. So, spin around and get even. (86)
Spawning in from a squad leader beacon will put you inside a drop pod. Be
sure to have a quick look around on your way down so you know of possible
threats. They will no doubt see you coming. (87)
Despite what people might tell you in the chat or over VoIP; pressing Alt
and F4 at the same time is not a way to get an unlock in this game. (88)
In the Awards section of BFHQ, you can see what criteria there are for each
awards and your progress towards them. (89)
Don't forget to add your friends to your Buddy List. This way, you can
always see if they are online and which server they are playing on. (90)
Short-winded? Fatigued easily? Need cardio? Get more points and unlock the
two sprint ability unlocks. One gives you longer sprint distance and the
other one faster recovery. (91)
When you receive a Buddy Message in a round you will get a notification on
the HUD. To read and reply to the message, press ESCAPE to go to the menu.
(92)
In the Titan game mode, you can check the time left until a missile silo
launches, by pressing the 'T' (default) key. (93)
As the Titan Commander you can put your mouse cursor over your Titan, in
your Command interface, to check its movement path. (94)
As the Titan Commander you can place your mouse pointer over a missile silo,
in your Command interface, to see the flightpath for that missile. (95)
The Titan under your command can affect quite a large area around it. Try
and find the best position on the battlefield to help support your ground
forces. (96)
As the commander, your job is to settle for nothing less than total victory.
Therefore your score is based solely on the performance of your team. You
will also receive a substantial bonus for winning. (97)
In the Titan game mode, APCs and Air Transports are also spawnpoints. (98)
As a squad Leader, or commander, you can place orders on many Networked
Battlefield icons; by putting your crosshair over the icon, hitting the 'T'
key and choosing Issue Order. (99)
Some of the ranked servers are Rank Restricted. Only players with the first
10 ranks can join games on these servers. (100)
Only a set number of players can have the three Top Officer ranks at the
same time. And there can only be one Supreme Commander. (101)
The drones help you as a squad leader but if they are activated in the wrong
place they can give away your position. (102)
Hitting the vehicles' soft spots will help you bring them down faster. (103)
The DysTek Hi-Scope x4 unlock enhances your sniper rifle with some extra
zoom possibility. (104)
The 3D map can be switched on and off using the corresponding key. When it
is enabled, you will see all the information made available by the Networked
Battlefield (NetBat) system. (105)